Hi, my name is Devin, and I am patient, diligent, and goal oriented. That opening line should preface the announcement that on the eve of the 2-year anniversary of designing a new tool that many would claim is overly complicated, I have finalized my designs and can display for you the physical components of said design.
The tool, you ask? Well, I have been calling it a 3-arm kerfing plane, but that does not quite do the tool justice. I think a more apropos name would be a 3-arm Rabbet/Rebate Saw as it will no-doubt excel at cutting out rabbets, though kerfing and rabbeting describe but only a fraction of the capabilities this tool will enable.
Without much further ado, allow me to present an arrangement of physical items in the real world that represent the design that I will be executing (which took nearly 2 years [to the day] -- I started work on this tool March 25th, 2021).
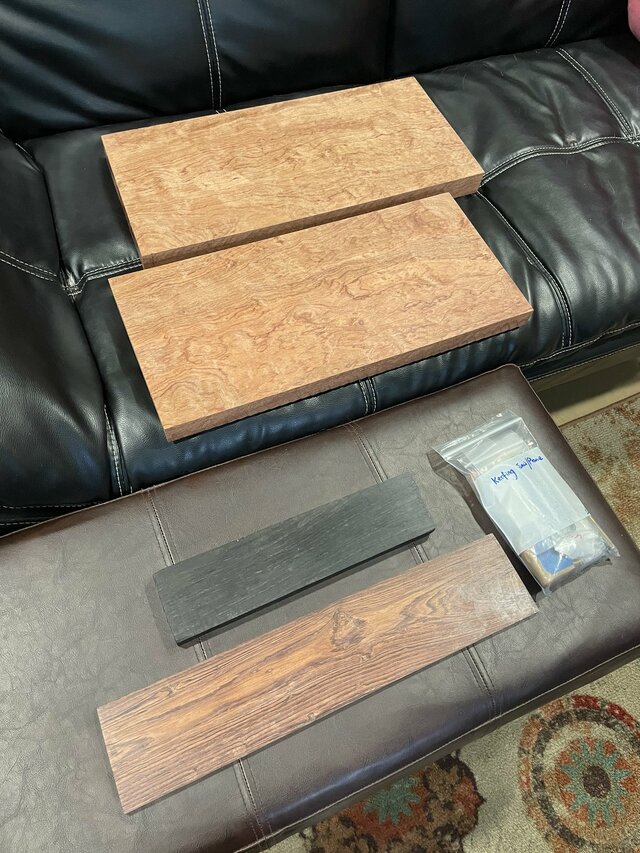
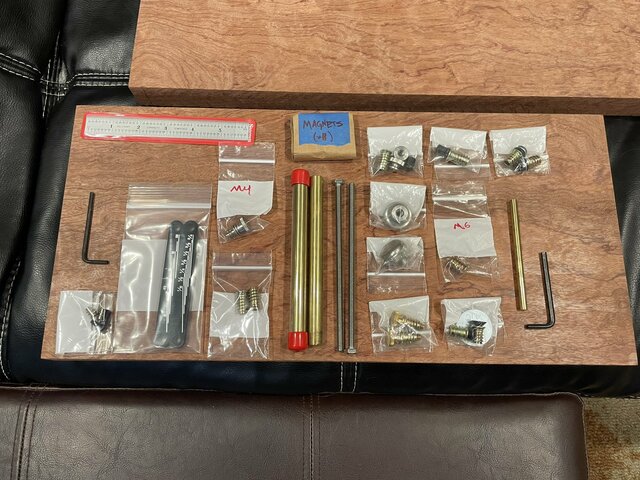
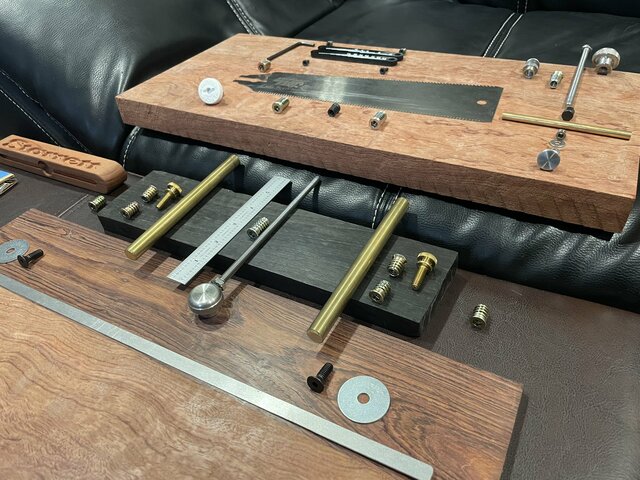
First up, let's look at the wood selection (with hardware kit placed nearby for scale -- hardware kit carefully put together by myself as I tracked changes to the design in real-time, ordering parts as I needed them and verifying with calipers that the specifications matched the parts):
Above, we have a selection of (top to bottom):
1. 8/4 Waterfall Bubinga thicknessed from approx. 1.75" down to 1.5" 2. 8/4 Waterfall Bubinga thicknessed from approx. 1.75" down to 1.25" 3. 4/4 Gaboon Ebony thicknessed from approx. 1" down to 3/4" 4. 3/4 Honduran Rosewood thicknessed from approx. 3/4" down to 3/8"
Below, we have a closer look at the woods:
Thicknessed by-hand.
Now, let's get to unpacking that kit. Let's just lay it all out so we can see what-all was tucked in there.
Those Plymor bags are awesome. They sure do hold a lot.
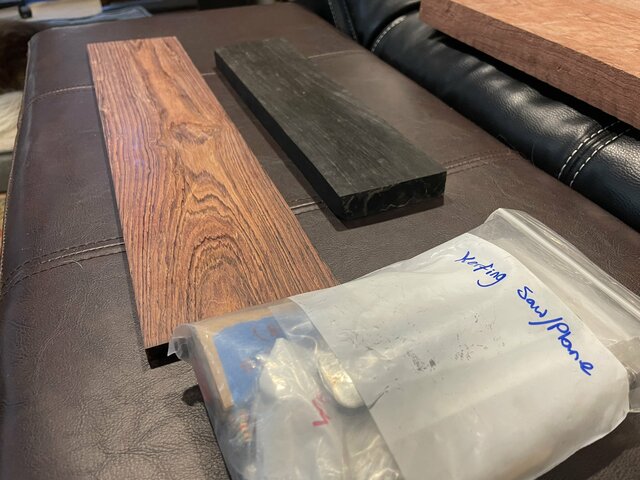
1. Starrett C604R-6 2. Allen keys (x2) 3. Depth gauges (x2; one Imperial, one Metric; made by me using 1/4" thick opaque black acrylic and white enamel infill) 4. 1/2" diameter brass rods (x2; for the fence) 5. M4 threaded inserts (x3) 6. M4 screws (x3) 7. 1/4-20 threaded inserts (many) 8. 1/4-20 domed knurled knob (x2) 9. M4 oversized washer 10. M4 DIN125 washer 11. 1-1/4" fender washers (1/4" ID; x2) 12. 1/4-20 allen screws (x4) 13. M6 threaded insert 14. 1/4" diameter brass rod 15. 6mm diameter x 3mm tall neodymium magnets (x8) 16. 1/4-20 swivel nuts (x2) 17. 3mm diameter x 450mm brass rod for inlay (x2) -- not in the kit bag (obviously), shown later 18. 1/4-20 thumb screws (x2) 19. 1/4-20 threaded rod (x2) 20. 1/4-20 knurled thumb nuts (x2) 21. Vaughan BS250D bear saw -- with M6 screw; not in the kit bag (obviously), shown later
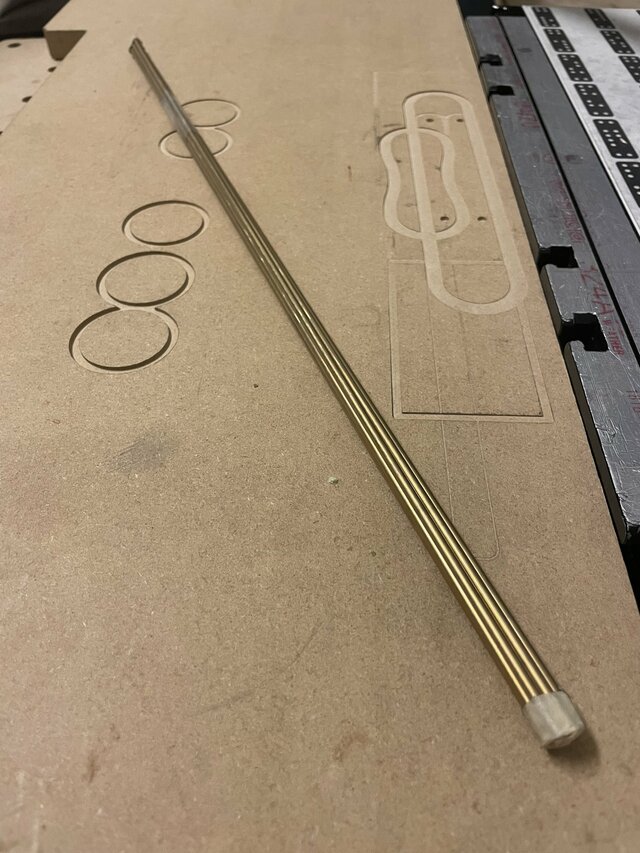
Oh, and back in the shop, here's that 3mm diameter brass rod.
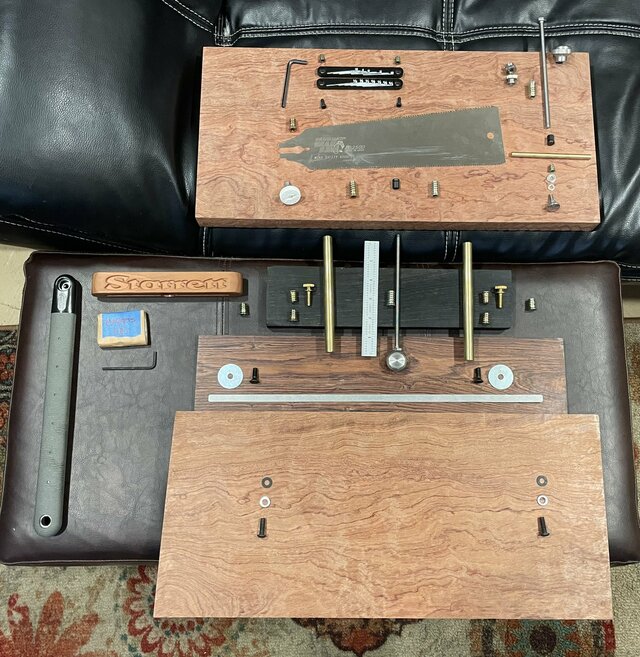
Let's lay everything out so we can see where it goes (sorry, forgot to throw the 3mm rod in the photo).
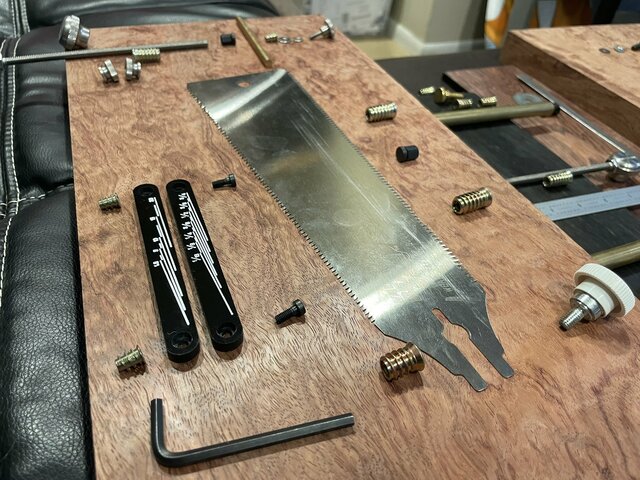
Off to the left in the above photo is the handle to the Vaughan BS250D Bear Saw which is removed in the process of making the plane, but is kept because, well ... let's say you are doing a resaw, the idea is that you would remove the saw plate from the plane and re-attach it to the factory handle and carry out the resaw. Really for any reason whatsoever, should you need to use the saw as the manufacturer intended, you can just pull the plate off the plane and re-attach the handle. Only two screws hold the saw plate on the plane, one of which is the manufacturer's own M6 screw that holds the plate to the handle.
Let's have another angle:
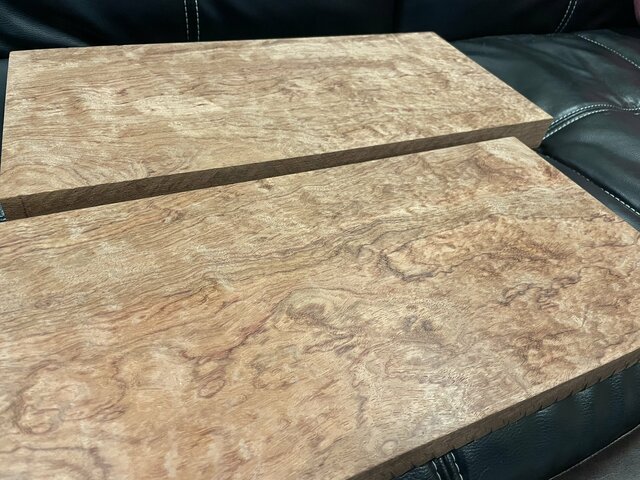
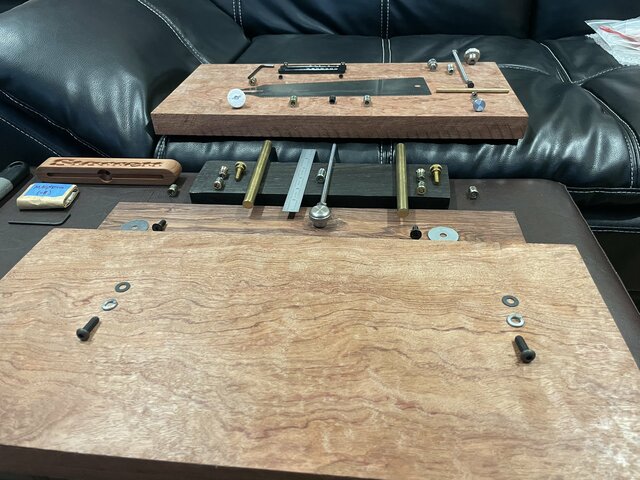
Above we are looking at what will become the molded hand fence. It seems strange to think that a single pair of 1/4-20 screws, some split lock washers, and a pair of fiber washers is going to hold that massive 20" x 10" x 1-14" hunk of Waterfall Bubinga to the plane, but more than half of that hunk (sigh) will be turned to dust when it becomes molded. The molding itself is one of my own design that I think accommodates the hand better than traditional molded fences on plow planes and requires 9 different router bits to achieve (one of which is hard to source and I can only get from Canada that I am aware of -- Kempston's 3/4" ball).
Let's step a little closer, shall we?
Above we are looking at a second fence and a main fence. This statement may seem confusing -- planes usually have a main fence (simply called "the fence") and sometimes an "auxiliary fence." The auxiliary fence bolts to the main fence. Well, this plane has TWO auxiliary fences and they work either alone or in concert. There is a molded hand fence which, as its name implies, is to be held in the hand. However, what if you want to make a cut atop a surface in the middle of a board (using an edge guide for example). Well, a molded hand fence will get in the way, and so you can remove it. Removing the molded hand fence is easy (the Allen key to do-so rests on the plane itself, held by a magnet in a slot, so that you [hopefully] never lose it). When removed, still-attached to the main fence is the (pictured above) Honduran Rosewood -- which is flat on the bottom. This "flat fence" attached to the "main fence" (the Gaboon Ebony -- black wood -- in the picture above) is ideal for guiding the saw atop a flat surface.
As a bonus, the flat fence has a strip of metal attached to it (see it there in the above photo?) that protrudes on one side only. Disconnect the flat fence, flip it over, re-attach it, and now you can slot the metal skate (which is but 0.015" thick) into a kerf of this plane (which is 0.026" wide). This allows you to create parallel kerfs spaced anywhere between 0" and approx. 6" apart. (max). What could that be useful for? Kerf bending. Make enough parallel kerfs and the wood becomes bendable. Most people will tell you that a table or band saw is required to do kerf bending, but I'm willing to see if it can also be achieved by hand (for fun and [lack] of profit).
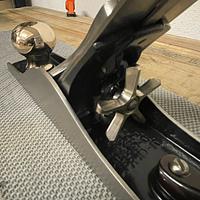
OK, let's take a look at the carcass.
Now we can see the meat and potatoes. Yes, the Allen key will be magnetically held to the plane for easy access for any fence changes.
So, does it look like I am heading in a good direction? Commeents/feedback welcome.
Looks like 100% premium hardware and materials, definitely on track to be a high end jewel tool that will excel in it's tasks with precision and perfection! Also looking forward to the grand reveal and action videos.
Eric, you might find interesting that in the final hours of design, I identified a problem wherein if one extends the fence all the way to 6 inches, AND is using the flat fence against an edge guide, there is the potential for some instability — which I quickly realized a supplementary skate would solve the problem easily and quickly, but how to solve without adding too much additional effort? It hit me, repurpose the CAB40 depth skid. So anyone, like yourself, with a CAB40 smoothing plane could in that one niche application find that my smoothing plane has parts that work on this saw. I like this a lot because then someone could reason “well, I could buy the supplementary skate should I ever need it, which is doubtful, or I could buy the smoothing plane and use the depth skid as a supplementary skate.”
Petey, I will dedicate the next blog arrival to revealing the design. I put a considerable amount of time into making it hyper-realistic so there is very little effort required of the imagination.
Steve, Splinter, thank you. With the exception of the threaded inserts (China), saw plate (Japan), and wood (Mexico, Brazil, Africa), everything else is US made
Devin, I'm terrible about reading the Blogs, and unless I trip across text about them in the Forums, or Projects sections, which I swing through more frequently, well I miss a lot.
I've been hearing Kerfing plane from you for a long time, and it's cool seeing it, at least the parts and pieces. I agree it does look like quality merchandise. Can't wait to see more. It must be a rush as what you see starts coming real, Best going forward.
It’s a rush, for sure, but what is sobering is coming to a realization just how expensive it is to be a maker these days.
What is my number one cost?
Electricity!
Hands-down, nothing cost more. Not the wood, not the time, not the parts. No, it is the amount of money that PG&E charges me every month for “hitting tier 4” (out of 4 tiers). It should be criminal to do what PG&E does, which as far as I can tell by reading my bill, is to retroactively up-charge every kilowatt hour used in the past month the moment you cross some imaginary threshold.
Every month, I end up paying close to 50-cents per KWh simply because I fall into the highest tier of use (they say).
I run multiple businesses out of my home. I run a (pitiful) server farm which has been reduced to one server, one monitor, and 2 x 24 port switches; I run my woodworking business out of the garage; and one other business.
My obsession with hand tools of late (to the point of manufacturing my own hand tools) is that it allows me to thumb my nose at PG&E a little more. Each day, I get closer to becoming a hand-tool only woodworker.
While I foresee that I will always need a CNC to make this kerfing plane, the plane itself (the way it is designed) allows me to do rip cuts, cross-cuts, kerf bending, rabbets, resaw kerfing, and more.
Though if I am honest, the initial motivation was deeper for creating the kerfing plane.
When I was 6, I was helping build a tree house and was lended a saw. It did not cut straight because what 6 year old can cut a straight line with a hand saw? So my whole life, I wanted a saw that would do the work for me of holding a straight line. It wasn’t until my 40’s that I learned about plow planes. It seemed obvious to me that if you put a saw blade on a plow plane that you’d get a straight cut no-matter what.
So, that’s what I did. I made damn sure my son was going to get the answer before the question. How do you saw straight at a young age when the adults will not allow you to use a band saw or if the material is either too large to bring to a machine or is already attached to something (like a tree house), precluding you from taking it to a machine? Oh, and back in the 80’s tools were much more dangerous (no brakes on any tools — circular saws kept spinning after use and they didn’t have those cute snap guards that cover the blade after the cut), so the likelihood a 6 year old was going to be handed a circular saw was nil.
Nah, when I was growing up, no power tool was ever deemed kid safe.
I want my kid to be able to build things that require sawing and I don’t want him to be frustrated and give up on woodwork by being told at the precise moment that he is making a judgement about the trade:
“Sorry, Timmy (not his real name), I know you are having a hard time cutting straight with a hand saw, but you cannot use the track saw, circular saw, band saw, chop saw, or radial arm saw yet. You are simply too young. Maybe when you turn 12 we can start on the scroll saw, but as a 6 year old, this hand saw is all I can give you, and I know in your hands it will not cut straight because your small stature and lack of command over the tool.”
This broke me at the age of 6 and I did not return to woodwork until nearly 4 decades later when I had the disposable income to do so.
So, naturally, after realizing I absolutely can make my own tools (after making a single hand plane, from a kit even), the very first serious thing I set out to make was a saw that will cut straight regardless of the user.
Albeit, I might have to make a smaller version for a 6 year old, but by-golly, we’re doing it! The tool works and requires very little skill to use, only a modicum of coordination. Anyone that can hold a tool with two hands and rock their body back and forth can now cut a straight line by hand without electricity.
Sure, everyone will dismiss both me and my tool, because surely, hand saws (be they push or pull) have done this for millennia — my kerfing plane is admittedly useless in some circumstances. However, I built it for making really long cuts and for my kid. Both long cuts and cuts made by the inexperienced will suffer when made using a regular saw.
I can envision it now. Put regular saw in kids hand. Kid cuts a wobbly line. Asks me how to cut a straight line. I pull out a miniature version of the kerfing plane scaled down to fit his tiny hands. He cuts a straight line. All is good and the boy continues to love woodwork.
Instead of what happened to me. Which was to be told in essence that while there are no less than half-a-dozen ways that the adults could cut a straight line, there was exactly zero methods explained to me how I, a 6 year old, could cut a straight line.
Of course, if only one of the adults had taught me about straight edges, guides, and clamps, then none of this would have happened. But instead the adults just shrugged and said “well, you’re just going to have to do the best you can with what I have given you.”
Well, damnit, that wasn’t good enough. I suffer from hyperthymesia, which means every moment of my life is vividly memorable, down to minute details, including things I am not paying attention to. Forgetting anything is extremely difficult, and if I am not careful, I can accidentally remember too much.
So while it is convenient for me to be able to thumb my nose at Pride, Greed, & Electric by using hand power, I am most chuffed about being able to mentally right a wrong — that if my son is anything like me and wants to build things at a young age (like I did), there will not be a brick wall placed in his way — to go so far and then be told you can go no further due to danger and now a required reliance on adults. I felt that was a cop-out by the adults.
Ended up spending 4 decades devoted to learning computers because the adults never put barriers in place with computers (mind you, the Internet did not exist at the time, so there were literally zero barriers placed in my way as a child when handed a computer; just told to go have fun).
It made me so angry beyond belief as a child that making this tool today is something visceral to me felt on a level that is in my bones.