


Share your craft projects
Make new craft buddies
Ask craft questions
Blog your craft journey
DevinT
2622 posts
and
21 followers
in over 3 years
in over 3 years
3-Arm Kerfing Plane #6: Open letter to Brent Hull
This is
part 6
in a
9 part
series:
3-Arm Kerfing Plane
I sent an e-mail to someone that I admire. He responded, which is amazing. His response was short and sweet:
Good stuff!
Good stuff!
Thanks for sharing.
B
This is what I sent him:
Hi Brent,
I hope this e-mail finds you in good spirits.
Thank you for taking the time to respond to me on YouTube. Not once, but thrice!
1. I was the individual that commented yesterday on ‘Vintage Hand-Tool Treasure Hunt’:
> (heart) you, Brent! Architect, builder, hand tool woodworker, and virtuoso. I bet you and I could really have some amazing conversations. I make custom hand planes, and I design my own moldings. I recreate old patents from the late 1800’s and early 1900’s. I want to sign up to your Patreon just so we can have the occasional 5-minute chat about old tools. Possible?
To which you responded:
> That would be great, maybe you can teach me more about hand planes. Reach out by email, (address). Thanks.
To which I say, most-excellent. I will do my best to be an open book. Speaking of books, I am self-taught by book.
2. I commented 2 weeks ago on ‘Fixing a Gambrel roof. One of my favorite house types. How to make an impact’:
> Thank you so much for recording this, Brent. I agree with the changes you made. Combining gambrels with gables can be seen in Stickley’s Craftsman magazine, design No 2 from Jan 1904. A personal fan of Stickley’s, I would also recommend checking out his two other gambrel designs, No 178 from Jan 1914, and No 202 from Feb 1915.
To which you responded:
> Wow, thanks for sharing. I forgot he had those.
To which I say, glad to be of help.
3. I commented 2 weeks ago on ‘Classical Design- The Secret Sauce of Building’:
> For a detailed yet simple system of classification for moldings, see 1993 book by John M. Whelan titled the Wooden Hand Plane: Its History, Form, and Function. I cannot recommend it enough. I now develop my own elaborate architrave moldings. P.S., I love your channel and have been recommending you to many friends. Cannot wait for more New House, Old Soul.
To which you responded:
> Thanks I’ll check it out.
For someone as skilled and knowledgable, I am taken aback by your reachability.
I have immensely enjoyed much of your online content thus far:
• Buildings & Brews
• Passion for Craft
• Tool talk
• New House, Old Soul
• much more
Which I can see puts you at a disadvantage as you know nothing of myself.
Before I met you virtually, I was not aware that the word “classicist” existed, but this is exactly how I feel about myself. I have made a lot of money in my career by studying the past.
I decided one day that I was going to figure out how hand planes work. Something that I never had the luxury to examine before as my grandfather would never let any of us grandchildren touch his tools. Some of those tools are now in my possession, and to better understand how they work was a long and storied journey.
I then decided I wanted to make hand planes myself. However, I was raised to respect others and as-such I will never copy the work of another. If it takes me years to make an original work, so be it. This is precisely what I have done throughout my entire life — study the past to make original works inspired by history.
Three years ago, after I finished reading cover-to-cover John M. Whelan’s first book, The Wooden Plane: Its History, Form, and Function, I was convinced that I could make a hand plane. As previously mentioned, I was on the lookout for how I could make it original. This proved to be a tall order since Whelan covered the history of the hand plane on 3 continents spanning 100+ years. After more research, I eventually came to a singular conclusion:
I should be making hand planes with stone inlay.
And so, three years ago I made my first prototype hand plane. The handle has a 40mm Bauxite cabochon.
I reasoned to myself:
1. We are careful with our tools, hand planes are no exception
2. Rarely does a craftsman drop his hand planes on concrete, if ever
3. The MOHS hardness of the chosen stone need merely be 6.5 or greater to ensure that it does not wear over time with use (any softer and random bumps with items on the bench could damage the stone, for example)
I then began amassing materials for a limited production run. I have not yet began that batch run — but I have over a dozen hand-selected cabochons imported from mines all over the World ready for marriage with wood and steel to make more.
ASIDE: My fellow craftsman colleagues urged me to join a “plane swap” a few years back. That is what got me into making planes, and what got me hooked. That is to explain that I don’t have that initial prototype with the Bauxite cabochon anymore, as it is in the hands of the swap recipient (and in-return I received a beautiful hand-made chisel plane).
However, a problem arose as I went to make my second hand plane.
I use ultra premium woods such as figured Bubinga, solid Gaboon Ebony, and old-growth Honduran Rosewood. These woods are extremely expensive, and to simply send them into a machine robs me of the experience of shaping these materials by hand.
So, what did I do? I devised a plan. A plan to study — and study I did.
French craftsman, André Roubo invented the "Roubo Frame Saw” — it’s like any frame saw except it lacks a bow and the saw plate is perpendicular to the frame. Any log that can fit between the stretchers of the frame straddling the saw plate could be cut, regardless of length. Whether operated by two men standing about a short log, two men with one in a pit, or a single man working a board, Roubo’s frame saw design allowed incredible resaw accuracy and capacity.
I actually went on eBay and bought an 18th century Roubo frame saw that is hanging in my shop. I won’t use it because of its age, but I definitely plan to recreate it anew so I can experience using it.
While researching how to do a resaw manually, I became aware of something I had never heard of before in all my hand plane studies — something called a “kerfing plane.”
It would seem that throughout history, dating back to the 18th century, occasionally craftsman would bolt a saw plate to the side of a hand plane to facilitate making a prescribed cut of narrow width — any time a cut called for less than 1/8th of an inch in width (the width of the most narrow plow plane irons).
I had to do a fair amount of research (6 months worth) to even find one example of a kerfing plane that exceeded 12 inches in length — but I did find one.
It would seem that coffin makers are the only professional craftsmen that married plow planes with large saws for the purpose of making accurate repeatable long-and-narrow cuts.
However, I did not ever find any example of a long cross-cut kerfing plane, nor did I ever see any example of one with a depth adjuster.
I had successfully recognized potential for originality in the creation of yet another hand plane (the initial offering being to put stone — of at least 6.5 MOHS — atop a plane for comfort, wear-resistance, and beauty).
I will spare you the 18 months of design decisioning that went into the creation of this latest prototype I am raising for patent (in an attempt to join the ranks of hand plane patent holders, such as Solon R. Rust and Edward M. Chapin of the late 1800’s). I will however say that I think I “jumped the shark” on this one.
What I think you will be most impressed with is my attention to detail on the integrated and auxiliary fences of the plane, of which provide reference edges/surfaces in utilizing the plane for a cut of particular need.
That is perhaps a rather old-timey way of saying (albeit with more words):
1. This kerfing plane can do cross-cuts, rip-cuts, kerf-cuts, through-cuts, … any cut needed
2. Utilizing interchangeable fences; there is a main fence and two auxiliary fences (one flat, one molded)
3. Capable of referencing either an edge, surface, guide, or previous (adjacent and parallel) cut
4. The molding on the molded auxiliary fence is of my own design
I endeavored to “pull out all the stops” or rather, never belay any value-add that I could arguably justify in the design process. It was a grueling endeavor to faithfully execute in-design every want, need, and desire that arose throughout the process of conceptualizing how I might go about accomplishing the above. Lots of breaks and nibbling away at the process day-in and day-out for over 700 days, I arrived at my eventual conclusion.
VIDEOS:
• Finished Kerfing Plane: https://www.youtube.com/watch?v=SqkA9x43EZQ
• Depth adjuster (short): https://www.youtube.com/watch?v=NOOBIuAxVlk
• 3-arm fence (short): https://www.youtube.com/watch?v=ZVcVzx6cOrA
This tool is actually related to the Roubo frame saw discussion above. It would seem (and I have confirmed this) that laying down a precision kerf for a hand saw to follow makes resawing by hand much easier.
André Roubo was a genius.
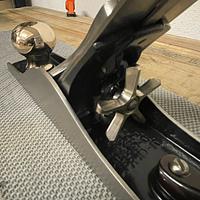
So if you take my prototype tool and lay down a kerf in some premium lumber like this figured Bubinga, like-so:
Then you can take the blade off of the plane, attach a handle to it, and then just follow the kerf, like-so:
ASIDE: So, it’s all starting to meld together. Study hand planes. Make hand planes. Save lumber by resawing and rabbeting out waste instead of milling it into dust. All in the traditional method, by hand, without the aid of electricity (except in the creation of the hand tools).
However, what I have perhaps not yet explained, and I cannot wait to discuss, is the fine hand molding of the tool and what it means in the context of marrying classic principles with modern technology.
MORE VIDEO FOR SPARE TIME:
+ Me: First hand plane I restored, a Stanley No 8 (T11): https://www.youtube.com/shorts/F0iNAfAptFE
+ Using the kerfing plane: First cut: https://www.youtube.com/shorts/lb5SkPhBmNc
+ Using: Test cuts: https://www.youtube.com/shorts/T-9TB-LQuMY
+ Using: Hand kerfing rosewood: https://www.youtube.com/shorts/uSemhWkgLxc
+ Using: Rosewood hand resaw: https://www.youtube.com/shorts/bDE6bUlVRMg
+ Using: Ebony hand rip-cut: https://www.youtube.com/shorts/1lpRctSliUY
+ Using: Hand kerfing Ebony: https://www.youtube.com/shorts/IMJhnWk8G5o
+ Using: Ebony hand resaw: https://www.youtube.com/shorts/Z7KlgUIZx8k
+ Making of: Tote shaping: https://www.youtube.com/shorts/ryZHWiyaCvY
+ Making of: Depth adjuster: https://www.youtube.com/watch?v=A6fJyaJTVik
+ Closeup: Solid Ebony Fence: https://www.youtube.com/watch?v=thKSaqgUuzo
+ Finishing: Oiling the rosewood: https://www.youtube.com/shorts/6Lsfdd30V3A
+ Finishing: Oiling the Bubinga: https://www.youtube.com/shorts/pn-BUSgbNZM
+ Making of: Ceramit vs brass rod: https://www.youtube.com/shorts/NHSQQ4VQbUc
+ Assembly: Threaded insert jig: https://www.youtube.com/shorts/kuSzFw-jsxw
+ Making of: Molding brass inlay refinement (1 of 2): https://www.youtube.com/watch?v=g4RJ7zzwyAI
+ Making of: Molding brass inlay refinement (2 of 2): https://www.youtube.com/watch?v=iXCF_KHtuXE
+ Making of: Fence adjuster demo: https://www.youtube.com/shorts/pEQQMI5UAvg
But this is what I really want you to see (below) …
I think you are like me and can appreciate a good molding. I want you to see this custom molding I designed with intent:
My custom molding: https://www.youtube.com/shorts/9ATYEtqrcOg
Designed with one singular intention: to fit in the hand.
The molding can be elevated with 3mm brass rod inlay into 1/8” coves in the molding profile.
Now, it should be obvious that this molding, designed to fit my hand, is unique in a number of ways. However, I would like to call attention to the idea that it is similar in structure to an architrave.
I did not design it to look that way, I designed it to be so comfortable in the hand as to abrogate any hint of repetitive stress injury. That is to say, that in the development of this molding (which itself, alone, took over 12 months of design effort) comfort was paramount. For literal months, I pretended like a mime to be using an invisible and imaginary tool around the house. I imagined myself to look like quite the fool in my own home rocking back and forth whilst holding books of various size in my left hand, trying to find the appropriate range of thickness for a hand fence as-to not tire my hand or risk carpel tunnel issues.
I feel that the only two things that modern technology is imparting here in my design of this plane prototype are:
1. We know today more about medicine, injury, recovery, and work related stresses on the body. That many old timers that performed the manual labor associated with hand tool woodworking will casually recount the importance of regular breaks and finding a tool that is comfortable (or modifying it to become comfortable). This 20/20 hind-sight afforded to us in the modern day allowed me to put focus on something worthwhile that I feel might prevent those issues of the past. I labored in the design process on how to best utilize the technology at our disposal today to achieve a misgiving of the past.
ASIDE: I am aware that the above sounds as though I am filled with hubris. I recognize that essentially stating that plow plane fences are poorly designed would place me at odds with masters of the past, and so I am careful to side-step this supposition. Rather, I merely observe that whilst supporting a molded fence in the left hand (for those that are right-handed), my fingers want to curl. The very nature of the molding is to follow Whelan’s definition of how moldings were developed, as a ratio of “on-versus-down” to traverse the stock. So-have-I designed this molding for my hand primarily around the 3/4” dia. cove for my fingers to curve about a stantion. The stantion itself being an integral component to an improved fence mechanism to be detailed in patent.
2. We have CNC machines today that can produce certain molding combinations previously inaccessible due to complexity. Producing my custom molding would be exceedingly difficult with hand planes, even if you had a full set of rounds, hollows, and sundry profiles. I did not intend that to be the case, but it simply happened by way of targeting the natural ergonomics of my hand.
ASIDE: I have not yet checked my molding for adherence to the golden ratio, but I am willing to bet that it maps well to said ratio given that I molded it around my hand.
I’ve put so much effort into this molding, that I want to apply it in other places, and I feel like you could help me with that.
I wonder if, for example, I couldn’t get Kiuken Brothers to make this profile for me as an architrave. I mean, sure, I’d love to use my Shaper Origin to hand-cut figured Bubinga moldings for a stain-grade architrave around every door, but reality tells me it would be smarter to have someone like Kiuken mass-produce the profile for my needs (be it paint-grade or not).
My issue of course is going to be to come up with an entablature that actually looks nice and goes well with my custom architrave. Or, perhaps after seeing my molding you will get an idea that it could be used somewhere else beside architraves.
ASIDE: That’s the thing, I’m not doing this to make money. I did this with the intent to make something comfortable for my tool. It is my molding, of my own design, never before seen in history that I am aware of, but I am not choosing to keep it to myself. I want people to experience its beauty and charm in either its base form (no brass inlay) or elevated form (with brass inlay).
So what have we got? Using the Whelan convention of naming, I will call out the profile elements starting from the least “on” element progressing “down” the profile (depth into the stock) — this is where Whelan’s naming convention draws a sharp distinction, that some moldings traverse left-to-right or right-to-left, but to eliminate naming ambiguity, the “on-versus-down” convention in the context of a sticking board should be applied. That the first element you name in a profile should be the most shallow element with respect to starting stock dimensions. As-such, …
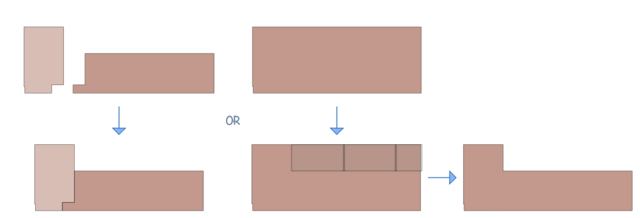
I first start with my stock comprised either of a single 8/4 board or instead two 3/4 boards rabbeted and joined thusly (we will cut the molding from a solid piece):
Next, it is conducive to take a glance at our instruments for shaping the molding:
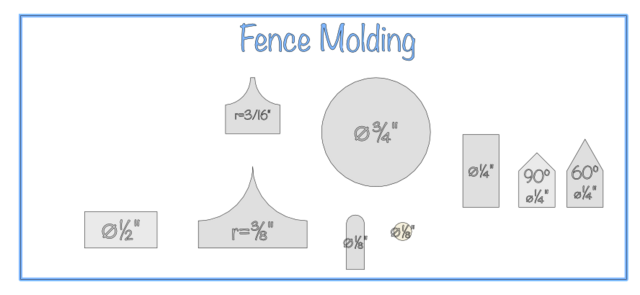
A couple of point-cutting roundovers, a couple V-grooves, a 1/2” dado clean-out, an 1/8” cove, a 3/4” dia. ball, and a 1/4” dia. end mill.
Either a gantry CNC or a well supported Shaper Origin is used in the following manner to achieve the realized molding:
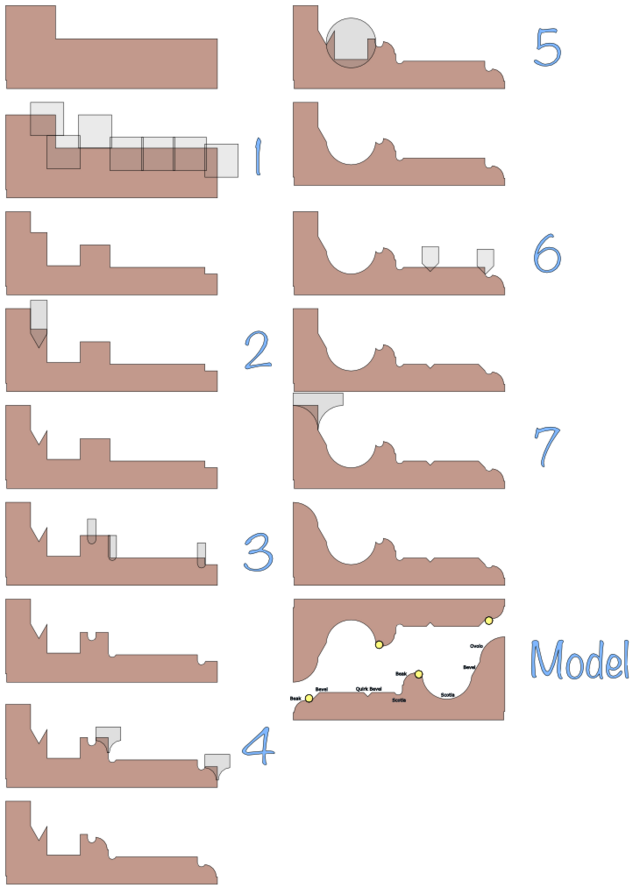
To whit, it is the end product worth observing.
Without the elevation of 3mm brass rod inlay, the base molding exhibits what Whelan would call “an extremely rare, if not unheard-of” molding comprising the Beak component. That is to say, the beak, while a recognized profile element from the past, is almost never utilized, and only ever seen in drawings. I read that after I had already decided that I wanted to utilize it for intent to house brass rod as a more capable wear strip in absorbing impact from when the user sets the plane down on the bench.
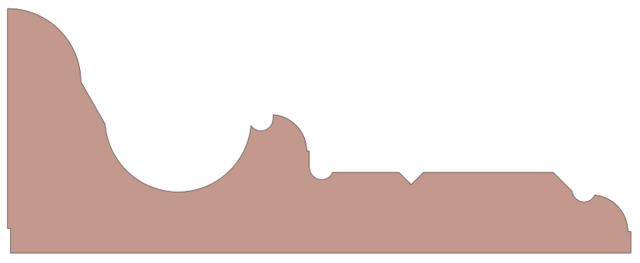
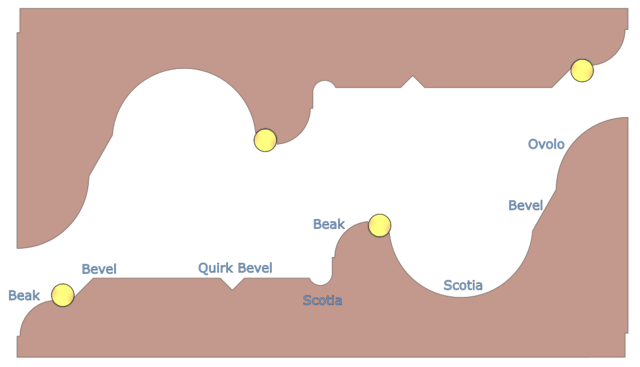
If I understand Whelan correctly, we should call this profile:
Ovolo, Bevel, Scotia, Beak, Scotia, Quirk Bevel, Bevel, Beak
But Whelan offers abbreviations for each:
Ovolo = V
Bevel = L
Beak = K
Scotia = S
Quirked element = Q prefix
NOTE: While a quirk usually tends to perpendicular return, there is no requirement for this, and it is said by Whelan that a bevel or splay return on a bevel/splay can be considered a quirk. See profile QLB on page 251 of History, Form, and Function.
So we can reduce this profile to:
VLSKSQLLK
NOTE: In accordance with Whelan’s rule on naming fillets, if the absence of the fillet between two elements would cause the descriptor of said two elements to change — for example, removing the fillet between a Bead and Cove element would cause the formation of an Ogee, meaning the fillet between the Bead and Cove is implied — then there is no need to name the fillet in the profile codification.
I have actually found the Whelan convention to be helpful. I can actually mentally picture VLSKSQLLK in my head on the letters alone. This is of course not intuitive without practice. In the case of this molding, the naming and production-thereof could be simplified by splitting the molding and not cutting it from solid stock — but instead affixing separate moldings. That being said, what would suffer is assembly time. I did not find that there was increased risk in trashing the entire molding here and actually like the solid construction.
Naturally, I had to profile the end-grain of the molded fence as Whelan explained that the old time plane maker would not take kindly to skipping said step. I would have to agree — the fence looks much better with the same molding that was applied to long grain being applied to end grain as-well.
All said and done, when I held the molding in my hand for the first time, I knew I had done the right thing. I knew the design hit on every mark that it was to deliver-on (and then some). Comfort, beauty, strength. It was all there.
Heretofore unmentioned has been the stantion. That middle beak.
When one holds the molding in their hand, the fingers fall into the large 3/4” dia. Scotia and one is able to force — by way of simply attempting to close one’s hand — draw the further beak into the palm. This grip is so natural and so comforting that I therefore draw the conclusion, rife with hubris, that I have created something that improves upon 250 years of plow plane design (in a tool modeled after vintage plow planes).
Specifically, I am recreating the 3-arm plow plane designs of Solon Ralzyman Rust (1832-1908) and Edward Merrill Chapin (1833-1896), with a minor influence from the Sandusky Tool Co. (1869-1926).
Except, when it came to the blade (saw plate) attachment, I decided to reject all historical and modern precepts.
I looked to mechanical engineering to apply a new concept of utilizing the saw plate itself as a member in a 2-bar mechanical linkage, thusly implementing a novel depth adjustment with micro-adjusting capabilities.
I am very curious of your thoughts on these matters and designs. Hopefully I have not scared you away with a monumentous doctoral-like compendium.
I sincerely saw in you someone like myself exploring the past with great zeal and could barely contain myself to share what I have been developing over the past 3 years in near-isolation (except to collude with my woodworking compatriots).
Open to any/all feedback.
—
Cheers,
Devin
Devin
1 Comment

Not sure about Brent, but I can't wait to see this thing.