


Share your craft projects
Make new craft buddies
Ask craft questions
Blog your craft journey

Ron Stewart
561 posts
and
20 followers
in over 1 year
in over 1 year
More from Ron Stewart


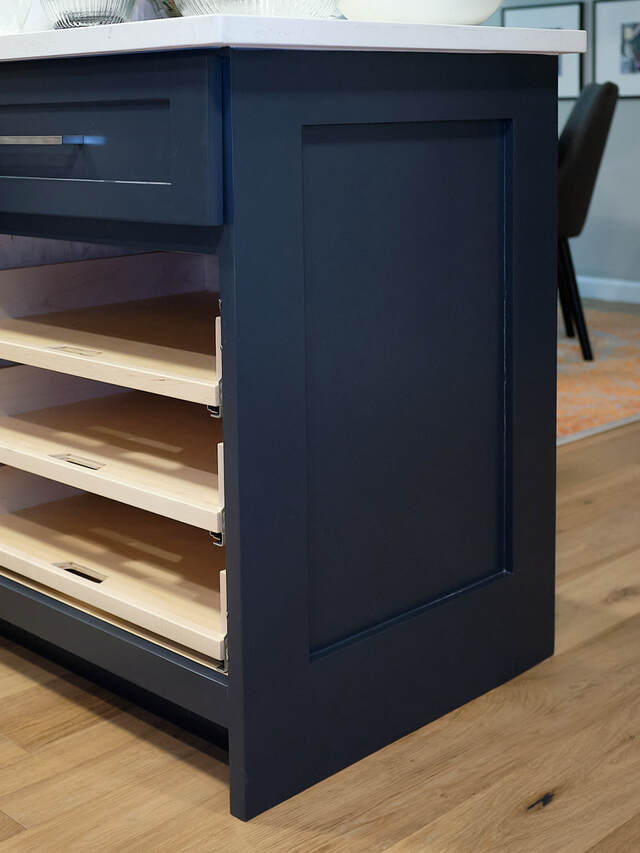
Kitchen Cabinet Pullouts


I originally documented this project on June 23, 2022.
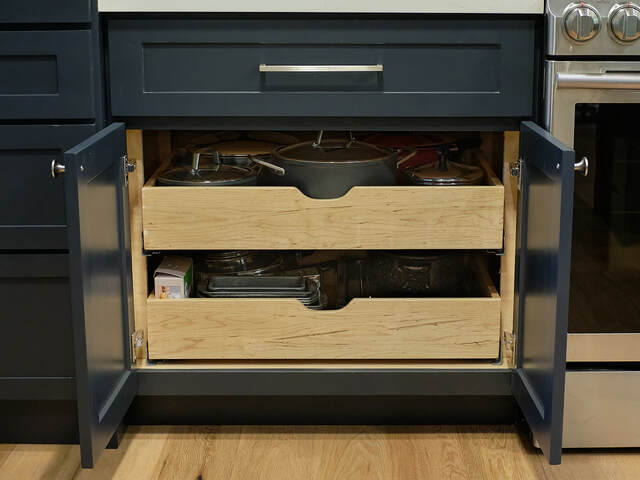
This is a set of pullouts I built for a peninsula base cabinet in our kitchen. The pullouts are hybrid drawers/shelves with cutout handles. They're mounted on 21" Blum undermount drawer slides (563H series). The slides are attached to vertical maple standoffs screwed to the cabinet sides/dividers.
The pullouts' sides, backs, and front faces are 5/8" thick maple, and the bottoms are 1/2" maple plywood. The finish is three coats of General Finishes High Performance Water Based Topcoat (poly).
Unlike most of my project posts, which contain numerous construction photos and details, this one focuses on the thought process that led me to build the pullouts the way I did. I'll also describe some differences in their construction compared to standard drawer boxes and discuss a few details about how they're installed in the cabinet. I hope this information will help readers who are contemplating adding pull-out cabinet drawers or shelves.
I uploaded a SketchUp model of the cabinet and pullouts (including dimensions and cut sheets) to 3D Warehouse.
Background (The Problem)
My wife and I had our kitchen (including the cabinets) remodeled in 2020. For the base cabinets, we chose the traditional configuration with drawers on top and open cavities (behind doors) below.
Our cabinets contain a mix of full-depth, height-adjustable shelves and pull-out drawers. For the peninsula cabinet, we opted against pull-out drawers and went with the shelves. We also asked the remodeler to add extra half-depth shelves.

The full shelves provided a generous amount of storage, and the extra half-depth shelves added even more, reducing wasted vertical space. Items near the front of the shelves were easy to see and access, but accessing the items farther back was inconvenient. Over time, the constant kneeling/crawling to store and remove items got more cumbersome.
The Solution
I asked my wife if we should reconsider pullout-drawers. My idea was to build them just like the others our remodeler had added. They're 5" tall, mounted on full-extension undermount slides attached to vertical standoffs. I proposed two drawers for each lower cavity.
She was open to the idea but was worried about lost storage space. To check, she cut out craft paper rectangles the size of the proposed drawer bottoms and tried to lay everything out. She quickly discovered that not everything would fit.
What if I could squeeze three drawers into one of the cavities (which held only shorter items-those less than 4 1/2" tall)? Out came the paper rectangles again (along with the tape measure for checking heights), and this time she was able to squeeze everything in.
Now her concerns were the lack of visibility and loss of instant reach-in access to items in front. These concerns were critical, because she uses these items (measuring cups, mixing bowls, etc.) all the time.
It seemed like we were stuck (and that I wouldn't be ordering that Porter Cable dovetail jig I'd been eyeing), but I told her I'd play around with some other ideas before giving up.
I thought about pull-out shelves, but I worried about things sliding off. The obvious answer was adding sides and backs, creating hybrid shelves/drawers. My only concern was whether such things would be sturdy enough to withstand constant usage over many years.
I also didn't know what to call these things. Were they drawers? No, those have fronts. Were they shelves? Probably, but in my mind, shelves are flat and don't have sides or backs. Were they shrawers? drelves? Only if I worked in marketing and felt no remorse at making up nonsensical words. In the end, I decided to punt and just call them pullouts.
Pullout Design and Construction
One important design consideration was that I wanted the aesthetics and construction of these pullouts to match that of the drawers in the kitchen as closely as possible, to keep the cabinets cohesive and make everything look as if it could have conceivably come from the same shop. We really like our cabinets, and I didn't want to do anything that cheapened them.
A firm requirement from my wife was a flush joint where the pullout fronts and bottoms meet (on top-there's a 1/2" overhang underneath). Any sort of lip there (even one as short as 1/4" or so) would catch items as she removed them, reducing usability unacceptably.
The existing pull-out drawers have dovetailed corners, so I used decided to use them too. (Porter Cable dovetail jig, come on down!) It was a bit tricky getting the fronts right. They're only 1" tall, meaning they have room for just one tail and two half pins on each side.
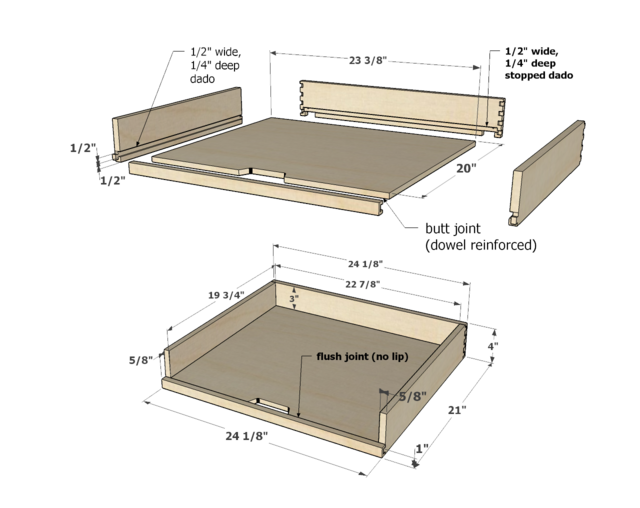
The narrow fronts also made me really worry about strength. In a typical dovetailed drawer box, the strength comes from the joints, and the drawer bottom floats within grooves in the drawer sides/front/back. The single-tailed dovetails on the front edges of my pullouts are mostly cosmetic. They don't really add any strength. To deal with that, I used dowels and glue to attach the fronts to the pullout bottoms and dados and glue to attach the bottoms to the sides and backs. The pullouts feel sufficiently strong, and I'm not worried about wood movement with the plywood bottoms.
The no-lip requirement also led me to add cutout handles right behind the fronts.
Mounting Details
Despite my earlier comment about this post being mostly conceptual, I thought I would provide some details on the mounting method.
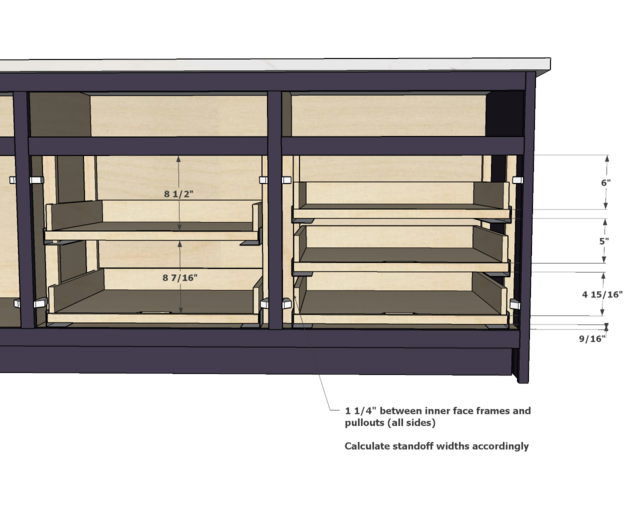
Based on what our remodeler had done, I left 1 1/4" of space between the inside edges of the cabinet's face frames and the outsides of the pullouts. That leaves about 1/4" inch between the pullout sides and the door hinges when the pullouts are extended. In our case, the cabinet openings were 26 5/8" wide, so the pullouts were 2 1/2" narrower, or 24 1/8" wide.
Our remodeler had also used vertical standoffs (not horizontal blocking like I've seen in most how-to videos and articles about drawer slides) to mount the pullout drawers. I like the idea, because it leaves open the possibility of repositioning the drawers vertically if that ever becomes necessary. I also like the idea because it makes it possible to attach the slides to the standoffs before attaching the standouts to the cabinet; that's a huge benefit.
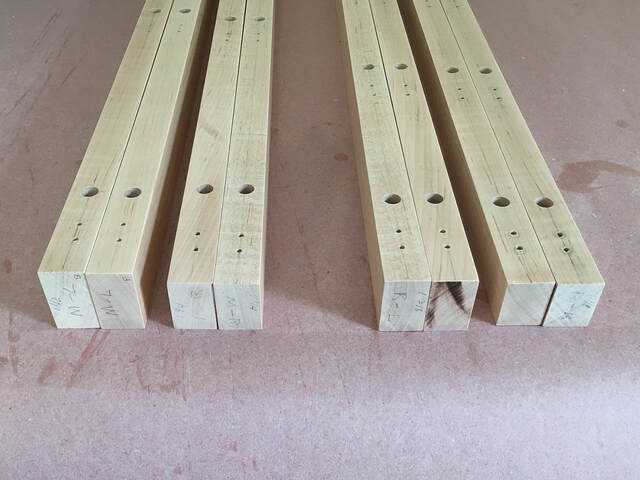
Here, I've cut out all my standoffs and predrilled holes for the slide mounting and standoff screws. I used a 3//8" pocket hole bit to drill stopped holes for the standoff mounting screws. (The stopped holes limit the screws' penetration to 5/8" into the cabinet sides.) I positioned the standoff screw holes about 1" above the slides (so the installed pullouts' sides hide them) and near the tops. (I offset the top holes on one pair of the standoffs so their screws wouldn't hit the ones on the other side of the cabinet divider.)
The no-lip requirement also led me to add cutout handles right behind the fronts.
Mounting Details
Despite my earlier comment about this post being mostly conceptual, I thought I would provide some details on the mounting method.
Based on what our remodeler had done, I left 1 1/4" of space between the inside edges of the cabinet's face frames and the outsides of the pullouts. That leaves about 1/4" inch between the pullout sides and the door hinges when the pullouts are extended. In our case, the cabinet openings were 26 5/8" wide, so the pullouts were 2 1/2" narrower, or 24 1/8" wide.
Our remodeler had also used vertical standoffs (not horizontal blocking like I've seen in most how-to videos and articles about drawer slides) to mount the pullout drawers. I like the idea, because it leaves open the possibility of repositioning the drawers vertically if that ever becomes necessary. I also like the idea because it makes it possible to attach the slides to the standoffs before attaching the standouts to the cabinet; that's a huge benefit.
Here, I've cut out all my standoffs and predrilled holes for the slide mounting and standoff screws. I used a 3//8" pocket hole bit to drill stopped holes for the standoff mounting screws. (The stopped holes limit the screws' penetration to 5/8" into the cabinet sides.) I positioned the standoff screw holes about 1" above the slides (so the installed pullouts' sides hide them) and near the tops. (I offset the top holes on one pair of the standoffs so their screws wouldn't hit the ones on the other side of the cabinet divider.)
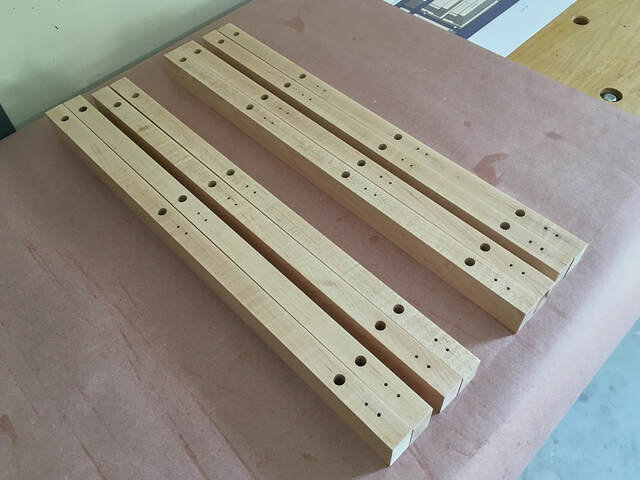
It took me about three tries to lay out the slide mounting holes to yield the correct vertical spacing between the pullouts, but all it cost me was time and erasing layout lines.
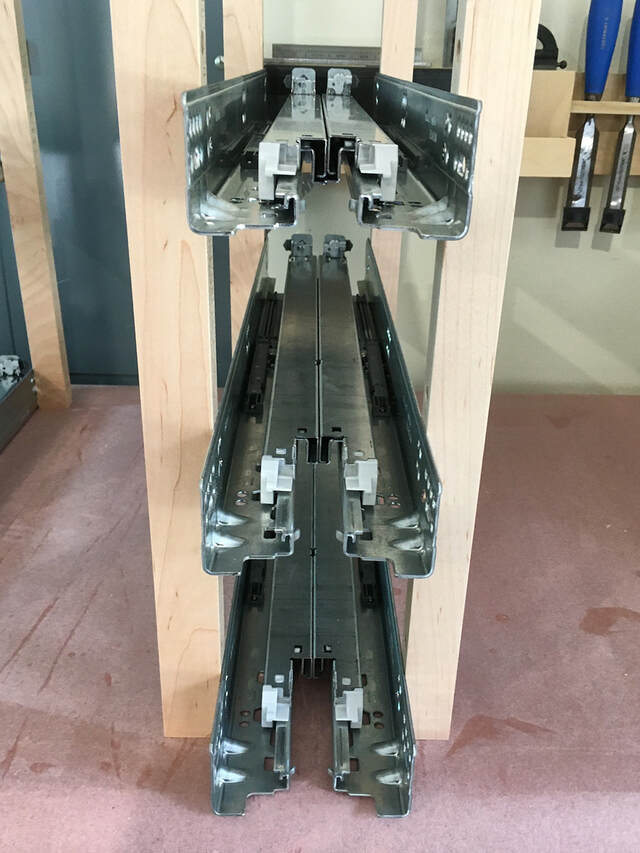
I also had to make the widths of each front/back pair of standoffs unique to center the pullouts horizontally within the cabinet openings. To determine the standoff widths, I started by mounting a pair of slides to a pullout, and then cut a strip of wood (a story stick) whose length matched the distance between the outer edges of the two slides. Then I placed the story stick in each cavity, centered it, and measured the distances to the cabinet sides/dividers. Here, you can see the varying standoff widths.
In preparation for installation, I attached the slides to the standoffs and made sure they lined up.
All of that prep work made the actual installation easy. I placed the slide/standoff assemblies in the cabinets, used a combination square to position the front standoff the correct distance from the cabinet front (the distance that placed the front of the slides 1/8" back from the face frame), and drove the screws. When I was finished, everything lined up, and the pullouts opened and closed smoothly. I didn't have to adjust the slides or add shims. They just worked.
Really, the hardest part was psychological. I had irrational fears of drilling (screwing) through the cabinet's end panel. It's framed and looks like this.
The frame is 3/4" thick, and the inset panel is formed by a 1/4" plywood "liner" inside the cabinet (meaning the framed area is actually 1" thick). I knew there was no way the pocket screws could penetrate all the way though the end panel because of the stopped standoff screw holes. I also knew that the standoffs were positioned within the framed area (not inside the panel), because I had measured the distances multiple times and placed a standoff/side assembly outside the cabinet to verify. Still, I was relieved when I peeked at the end panel after driving the screws.
Final Thoughts and Tradeoffs
When I started this project, my wife and I hoped it would yield something close to the best of both worlds: the visibility and easy access of shelves, and the full access of pull-out drawers. I'm happy to report that our hopes were fulfilled. After living with these pullouts for a few weeks, my wife is extremely happy with the results.
To reinforce just how much usable storage these pullouts have, here's a photo of the contents. (For reference, that peninsula is just over seven feet long.)
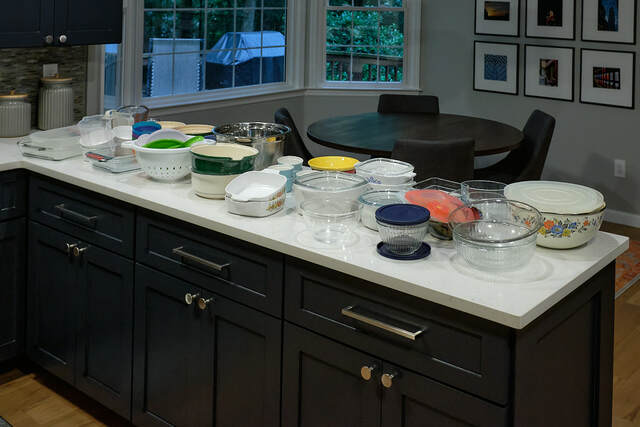
All of that fits into two cabinet cavities, with the most frequently used items within easy reach.

The use of drawer-like storage with undermount slides does come at a cost in terms of space.
Vertically, the cost is 1" for the bottom pullout and 1/4" for each other pullout, so we lost 1 1/4" from the center cavity and 1 1/2" from the right cavity. Side-mounted slides would have required slightly less vertical space, but I didn't consider them an option because our cabinets use undermount slides exclusively.
Horizontally, we lost about 4" of width, and about 2 5/8" of depth, per full shelf. That's about 158 square inches, or about 25%, per shelf, which is significant, and more than I would have thought. In our case, the improved accessibility outweighed the space loss, but that might not be true for you.
In terms of actual money, these pullouts cost $85 each (not including the dovetail jig I bought). Most of that money went into the Blum slides, which cost me $51/pair at Rockler. (Blum slides are in short supply these days, with 8-week lead times being common. I suspect they used to cost a lot less. Rockler also doesn't have the lowest prices around, but I trusted them to manage their backlog and ship me the right slides when they became available.) Lumber and plywood costs also hit us pretty hard. The maple lumber cost $9/bd. ft. at my favorite lumberyard, and the junky plywood quarter sheets cost $26 each at Lowe's. I'm glad we're not building a house now.
Thanks for reading!
10 Comments

Good job Ron
-- Soli Deo gloria! ( To God alone be the Glory)
Very Nice. I built and installer some of those in my wife's kitchen some time back she loves them. They are a very handy addition to a kitchen.
-- Soli Deo gloria! ( To God alone be the Glory)
Thanks, oldrivers! Yes, they are very handy. They took care of the only thing my wife didn't totally love about our remodeled kitchen.

thats the only way to go.in our kitchen it's all drawers,the only cabinet thats not is under the sink.
working with my hands is a joy,it gives me a sense of fulfillment,somthing so many seek and so few find.-SAM MALOOF.

Excellent project & writeup. A good result is almost guaranteed when you have such a good connection with the customer!
Thanks, pottz and Steve. We talked about drawers when we had the work done, but my wife prefers the look of drawers over cupboard doors. And, yes, Steve, it does help to have such a connection. :-)

That is a wonderful project, and well done.
Main Street to the Mountains
Thank you, Eric.

Very well planned and designed. Love the organization plus easy access. I would have sweated screwing through the end panel too! Turned out great.

It seemed like we were stuck (and that I wouldn't be ordering that Porter Cable dovetail jig I'd been eyeing)
🤣 Yeah, I like the old "how am I going to get a green light on a new tool purchase out of this?" approach, too.
Nice work - I really like these and I'll be back to reference when I re-start work on my lower cabinets.
Nice work - I really like these and I'll be back to reference when I re-start work on my lower cabinets.
More from Ron Stewart