Share your craft projects
Make new craft buddies
Ask craft questions
Blog your craft journey
Craftisian Blogs
view blog series
I have completed the fenders for the first model. I decided that I would create the fenders for the model to be painted since I am using poplar fo...
Today I started working on the tires and wheels for the first AC Six. The wood used is simple poplar but since they will be painted or dyed, I did...
As a veteran myself, it’s more than respect for my great grandfather Harry Fourro died from wounds, buried at Boulogue Eastern Cemetery; for my gra...
From time to time I'm asked how I made some stuff for my models. In this series I will make a blog per component.
This time a steering wheel is m...
From time to time I'm asked how I made some stuff for my models. In this series I will make a blog per component.
In this blog the Axle pegs. Thes...
WIth the blocks assembled, time to move on to the end caps.
There will be one for the top side of the lower block and top/bottom for the middle blo...
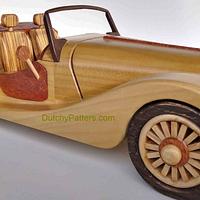
Hello everyone. This is part one of my blog on building the AC Six pattern by Dutchy. In October, 2024, I contacted Jan and asked him if he had e...
First off, thank you for your input and kind words. I am happy to share what little knowledge I have on this model but I really hope to share my e...
Yesterday I mentioned in a message post that I had finally reconciled not finding a way to create the Cooling Vents in the Cowling that exist on th...
Some time back I made a floor lamp project and at the time I also made two shades since it is easier to knock a few out versus just singles with al...
From time to time I'm asked how I made some stuff for my models. In this series I will make a blog per component.
I will start with the axle cabs...
I logged in today and was surprised to see Bob Puttman shown in Members Spotlight
[Grizzman.png]
A bit of an Opps to say the least.
Martin/Debbie ...


