


Share your craft projects
Make new craft buddies
Ask craft questions
Blog your craft journey
MJCD
173 posts
and
9 followers
in about 10 years
in about 10 years
More from MJCD


High-Back Chair - 1st Prototype


I’ve been away for awhile; and thought that some of the forum members might be interested in this first-draft of a High-Back Chair. With this first attempt complete, I’ll take some time (and hopefully receive some feedback) to consider design changes and subtle points that I should incorporate into next attempts. For example, I’ll probably reduce the length of the Back Braces extending beyond the Back Brace Support, at the top of the chair. Also, the upper shape of the Back Braces should toe-in more toward the sitter…
The following is long-winded; and I provide this for those interested in design considerations and decisions made regarding them.
Some Build Particulars & Notes
Woods: Rhodensian Teak, Hard Maple
Joinery: Pegged and floating (Domino) tenons; Trestle Wedges
General Comments
This is a ground-up design, 1st-prototype high-back chair. The intent is to create a stationary chair that has both the strength & flexibility to fully support a sitter, regardless of the sitter’s position; also, that the overall design be visually light while easily supporting up to 250lbs… to pick a number.
This chair is sized for a tall adult – accommodating someone up to 6’6” – with a 20” wide and 42” high (at the Back Brace Support) overall dimension. The Hard Maple Frame is 5/4 × 6/4 (finished) and secured using both pegged and floating mortises where appropriate. Two Trestle Wedges are used to further secure the middle Back Braces. No screws or metal fasteners are used.
The chair is finished with two coats Zinsser Sealcoat and four coats Deft Waterborne Acrylic – #600 grit wet sanding is done after the second Sealcoat and between the 3rd & 4th Acrylic coats. A final #2000 grit wet sanding completes the finishing.
Re-sizing the chair (for small and medium builds) would require a separate Back Brace shape… to ensure proper support across the shoulders and head support.
Design Elements
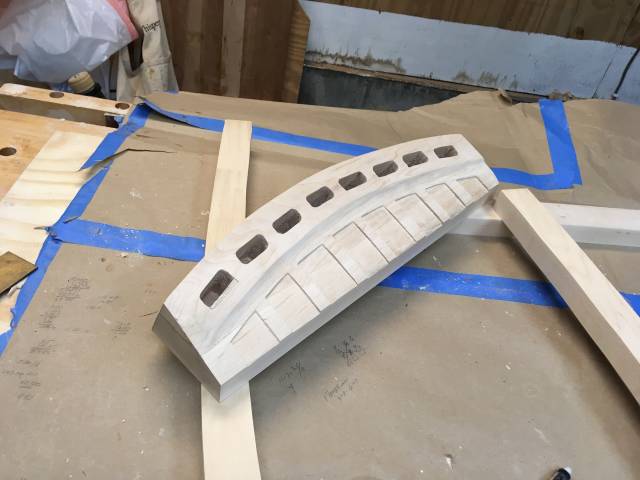
Initially, I wanted a set of continuous laminations forming both the back and the seat; however, the Teak resisted so many of my efforts to achieve this, that I opted for separate Back Braces and Seat Slats, with a Transition Block accommodating the mediating space. The Transition Block serves to a) hold the Back Braces, via a 2” (20 degree angled) mortise; b) provide a slotted-terminus for the back of the Seat Slat (this is angled to smooth the sitting position); and, c) bears the primary downward sitting force. Structurally, the Transition Block is mortised and tenoned to both under-support blocks, as well as directly to the Frame side.
As mentioned, the Back Braces are secured via an angled (20 degrees) mortise in the Transition Block – Trestle Wedges are used to take-up slack, where needed, at the base of the Back Braces. At their top, the Back Braces slip through a Back Brace Support, that both affords a degree of freedom and constrains them – while the BB can move to flex with the sitter, they are constrained sufficiently to support each other. The Back Braces are not ‘affixed’ to anything, yet provide flexible solid support.
The Transition Block has 8 arc’d mortizes that serve to splay-out the Back Braces as they rise above the TB – the first & eight Back Brace rise ‘through’ coves in the Arms.
The Back Brace Support houses ‘through mortises’ that allows the Back Braces to run through them. As the sitter presses back against them, the BB splay-out from the Transition Block, and away from each other. If the BB are held rigid, uneven torsional forces could eventually undermine the laminations. The Back Brace Support is free-standing (not glued nor otherwise affixed), and rests on pins mortised into the 1st & 8th BB backs.
The Transition Block is sized to handle significant stress – starting as a 4” x 6” block; whose sections are then processed for Back Brace, Front Slats and Back Stretcher roles.
The Front Stretcher has (8) 1/8” slots to accept the front portion of the individual Seat Slats.
The chair’s width has a -4 degree taper front-to-back.
Prototype Issues
Prototyping is very time consuming, especially when incorporating bent lamination parts; and the whole design-while-you-build has many attendant consequences. That said, this is a very buildable chair… now that I’ve settled-in on dimensions and specific curve and structural forms.
Final Thoughts
Don’t use Rhodesian Teak for bent lamination projects!
This project started as a personal challenge; if I were to build another one, I would choose a more flexible dark wood, and probably try again to build a continuous Back Brace/Seat bent lamination chair. That said, I really enjoyed devising the Transition Block – its execution was a bear – it max’d-out my design and woodworking skills. Also, the next chair will included more-repeatable processes and more precise end-parts.
I encourage those who see something they like within the design to create their own version – and then tell us about their experience.
Everyone, Do Take Care.
MJCD
10 Comments

This is a very interesting design as are the construction details. At first something about the crest rail bothered me thinking it was just applied to the seat slats but viewing it in profile I liked the concept and uniqueness of that design. I have only designed a couple of chairs and none of them were as accomplished as this design in that being a real stand out for its look or construction. A Job very well done Indeed. Congrats!
woodworking classes, custom furniture maker
jim:
Thanks for the response, and the comments. I’ll include a picture of an early, rough version of the Transition Block. I am unhappy with the quality of the arc’d mortises – I started-off doing these with a Festool Domino (with initially good results); however, a 2" depth was necessary – which is well-beyond what the Domino can provide. A follow-up piece would require a precisely-made template for heavy-duty routing.
The Crest Rail was made by creating two 1″ × 4″ × 30″ strips with mirror dados cut on the table saw. When glued-up, it is then cut into 8 sections; 4 degree mitered edges are applied, then glued – thus creating the arc. The Crest Rail’s arc radius is the same as the Transition Block’s radius: the Back Braces naturally extend through the Crest Rail mortises.
You Take Care.
A truly unique feature.
woodworking classes, custom furniture maker
Also a good cheat on the mirrored dados, I’d done that some time ago but had forgotten that great trick, another part of the process that was very well done.
woodworking classes, custom furniture maker
Jim:
If there is one altruistic purpose for contributing to a forum, it would be sharing cheats, and tricks, and traps. I can’t begin to chronicle all that I’ve learned from other woodworkers, on many woodworking sites. It takes two or more to share, though.
For the mirrored dadoes, the Teak is simply too tough to use hand tools.
Another design element, just to mention it, is that the Crest Rail has a double arc: front-to-back, and top-to-bottom (the sides are lower than the center-peak); both of which match the radius on the Transition Block. Hal Taylor often refers to this as repetition of form that is invisible to the eye… if done well. Maybe some day, when I grow-up, I’ll make something in Hal’s class.
You Take Care of yourself.
Mike
I know what you mean Mike I too have learned a lot and shared a fair amount.I guess I’d forgotten about the one half at a time morticing is that I’ve have had a morticer and Multi-router for some time and haven’t had the need but the half at a time process. it’s good for me to share with students who don’t have the convenience of the tools I have.
woodworking classes, custom furniture maker
Jim:
You’ve shared a lifetime of experience!
With this prototype complete, I’ll turn my attention to building a classical guitar – never having done one. This should keep me busy for the summer.
Mike
Look forward to that build Mike,Enjoy!
woodworking classes, custom furniture maker

Great build and a beautiful chair.
Losing fingers since 1969

Your talent as a woodworker can really be seen in the great job you did making that chair . Nice job
Wheaties
More from MJCD