


Share your craft projects
Make new craft buddies
Ask craft questions
Blog your craft journey

shipwright
2073 posts
and
113 followers
in over 12 years
in over 12 years
Watercolour Dye Technique #4: Toscana, Disassemble, Dye, Re-assemble
This is
part 4
in a
7 part
series:
Watercolour Dye Technique
...
-
Tips and Tricks I've Learned
-
Toscana, Disassemble, Dye, Re-assemble
-
Toscana, My most intricate dye job to date
...
...
- Tips and Tricks I've Learned
- Toscana, Disassemble, Dye, Re-assemble
- Toscana, My most intricate dye job to date
...
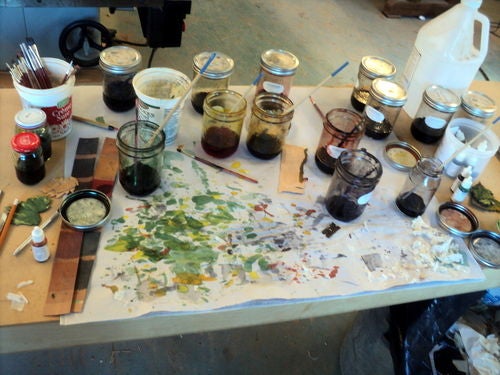
The general method of applying the dye is with an artist's brush as seen in the first segment of this blog so I won't go into great detail here. Suffice to say that each piece is done separately in one or more colors allowing the color to flow into the grain. The work area will become colorful so a cover of several layers of paper is a good idea.
The procedure I used here was to first mount the whole piece on clear "Contact" shelf paper face side up and then to remove a few pieces at a time, soak and peel the tape from the surface, dye them, and return them to their places. It is important to work on an adhesive surface like this and to work from the outside in toward the center because the pieces will expand with the water both from tape removal and dye. If the newly dyed pieces were not confined by the pieces around them they could not be made to re-assume their exact positions and you would never get them to fit. It is also important to have some weight to keep the pieces flat. I used acrylic plates.

This is a tree in the background by the farmhouse. It first gets a bath of yellow on its sun side, then a dark green on its shady side, then just a line of very dark green on the very edge. You can't see the yellow at the end, but its effect is there.


You can begin to see the effect of the wiggly cutting here.

The picture is coming together nicely ........

........and the work area is becoming more colorful as well. At one point I counted 19 brushes, ten colors and six dilutions of base colors in use.

At last it is all dyed and everything has been forced back into its place. It is amazing how malleable these pieces of wet wood are. I fitted some of the larger pieces (leaves) that were 1/4 inch bigger than their spaces. I just inserted top and bottom and pushed the middle down ….. and they just compress down and fit… snap. That's why the acrylic is there and that's why there are no gaps. You can't believe it until you do it. I should add that I did dry each piece with a hair dryer for some time before assembling but they were still quite swollen.

So I guess you're thinking the fun is over for this time. ....... Wrong! ...... The fun part hasn't even started yet.
Next up is to get this whole thing mounted and finished without any sanding and without making the dye bleed and without losing the shape and integrity of the assembly.
Sounds easy when you say it that way.
How I managed that next time (yes, it is already just about finished).
Thanks for looking
Paul
The early bird gets the worm but its the second mouse that gets the cheese.
3 Comments

That’s a very eye-catching piece, Paul. I find myself thinking I might dye the sheets of veneer before cutting to avoid some of the fitment problems, but I would probably be getting new problems…
May you have the day you deserve!
*Dave,* I dye raw veneer too but different dye, different technique.
This blog entry is a general idea but I’ve come a ways since then. The article it refers to is on this site somewhere but I’m not sure where.
https://craftisian.com/entries/1099-dyeing-veneer-an-update
This blog entry is a general idea but I’ve come a ways since then. The article it refers to is on this site somewhere but I’m not sure where.
https://craftisian.com/entries/1099-dyeing-veneer-an-update
The early bird gets the worm but its the second mouse that gets the cheese.
I guess the article is not archived. This album will give an idea anyway.
https://photos.app.goo.gl/iG615qRUFo5iPETx2
https://photos.app.goo.gl/iG615qRUFo5iPETx2
The early bird gets the worm but its the second mouse that gets the cheese.